Update Dynamic Properties of Product (Product Properties) in Dynamics CRM/365 – C#

Its a two step process to update Dynamic Properties of Product (Sales Order Product) Or Product Properties of your sales order.

  1. Query “dynamicpropertyinstance” entity by “regardingobjectid” – here, your regardingobjectid will be your salesorderdetailid.
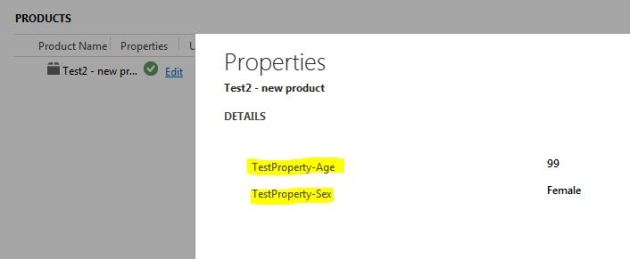
    • By querying crm, you will retrieve all properties for that sales order product. Here in my example case, TestProperty-Age and TestProperty-Sex
  2. Run the loop for all rows inside your retrieved Entity Collection, set the desired values and call update method.
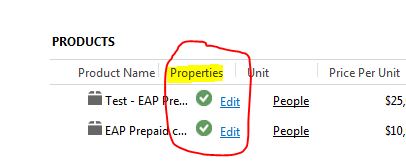
Example CRM UI:

UpdateProductProperties

Please see C# script below:

public void goCreateObject(IOrganizationService service)
{
   QueryExpression objQueryExp = new QueryExpression();
   objQueryExp.EntityName = "dynamicpropertyinstance";
   objQueryExp.Criteria.AddCondition(new ConditionExpression("regardingobjectid", ConditionOperator.Equal, "5b8ff2cb-b533-e711-8113-e0071b668xxx"));
   objQueryExp.ColumnSet = new ColumnSet(true);
   EntityCollection entColDynamicProperties = service.RetrieveMultiple(objQueryExp);
   try
   {
       foreach (Entity entity in entColDynamicProperties.Entities)
       {
	   if (((EntityReference)entity.Attributes("dynamicpropertyid")).Name.Contains("TestProperty-Age"))
           {
	        entity.Attributes("valueinteger") = Convert.ToInt32(99);
           }
           if (((EntityReference)entity.Attributes("dynamicpropertyid")).Name.Contains("TestProperty-Sex"))
           {
	        entity.Attributes("valueinteger") = Convert.ToInt32(1);
	   }
	   service.Update(entity);
       }
     Interaction.MsgBox("Success");
   }
   catch (Exception ex)
   {
       Interaction.MsgBox("Exception! " + ex.StackTrace);
   }

}

Create Sales Order Detail record- MS Dynamics CRM through C# Script

You might have requirement to create Sales Order Detail record programmatically. Please find the code below for the same!

public void goCreateObject(IOrganizationService service)
{
    Entity orderDetail = new Entity("salesorderdetail");
    Guid _soid = new Guid("660cf2c7-8c33-e711-8115-e00xxx");
    Guid _pid = new Guid("1ace6e83-8b33-e711-8115-e007yyy");
    Guid _uomid = new Guid("839e561d-17b8-4c8a-8baf-37zzz");
    bool _price = false;
    bool _product = false;

    orderDetail.Attributes.Add("salesorderid", new EntityReference("salesorder", _soid));
    orderDetail.Attributes.Add("productid", new EntityReference("product", _pid));
    orderDetail.Attributes.Add("quantity", Convert.ToDecimal(1));
    orderDetail.Attributes.Add("uomid", new EntityReference("uom", _uomid));
    orderDetail("ispriceoverridden") = _price;
    orderDetail("isproductoverridden") = _product;
    Guid _orderDetailId = service.Create(orderDetail);

}

Retrieve Product (Dynamic) Properties from MS Dynamics CRM/365 – C#

As I was doing my project to integrate Dynamics CRM with other applications, I found out that there is lot of confusion on how to retrieve “Product Properties” or “Dynamic Properties” (programmatically) you configure for the “Product”. So I have put down below simplified version for the same.

ProductProperties

Just FYI, you can found out Product Properties in one of your entities, called “Property Instance (entity name: dynamicpropertyinstance)”

So little bit of context on the way our Dynamics CRM configured:

  • Contract (“salesorder” entity)
  • Contract Products (“salesorderdetail” entity)
  • Product Properties (“dynamicpropertyinstance” entity)

So I would say, its a three step process to retrieve Product Properties from Dynamics CRM.

  • Query Dynamics CRM to retrieve Contracts – You will get “salesorderid” attribute.
  • From “salesorderid” attribute, query Contract Products – You will get “salesorderdetailid” for each product in your contract.
  • From “salesorderdetailid” attribute, query Product Properties. If you browse dynamicpropertyinstance entity, you will found out “regardingobjectid” attribute. Just query this entity by passing “salesorderdetailid” into “regardingobjectid” attribute and you will get what you’re looking after!

Please see below C# script:

QueryExpression crmServAgrQuery = new QueryExpression();
crmServAgrQuery.EntityName = "dynamicpropertyinstance";
crmServAgrQuery.ColumnSet.AllColumns = true;
crmServAgrQuery.Criteria.AddCondition("regardingobjectid", ConditionOperator.Equal, "ef8b4b6e-52x-e711-81yx-e0071b68f921");
EntityCollection collection = service.RetrieveMultiple(crmServAgrQuery);

try
{
     foreach (Entity entity in collection.Entities)
     {
           Contract crmContract = new Contract();
           if (entity.Contains("dynamicpropertyid"))
           {
                crmContract.propId = ((EntityReference)entity.Attributes["dynamicpropertyid"]).Name.ToString()
           }
           if (entity.Contains("valueinteger"))
           {
                crmContract.value = entity.Attributes["valueinteger"].ToString();
           }
     }
}
catch (Exception ex)
{
    log.Error("Exception while retrieving data from CRM. Error:- {0}", ex.Message);
}
finally
{
  // release objects if any
}

Sort Combobox VB.NET

Please find really simple code below to sort your combobox control in ascending or descending order.


  ' Create dataview (I assume you have got your data in your datatable!)
  Dim dv As DataView = New DataView(dsEmp.Tables("MemberData"))
  ' Display Name is columns name that you would like to bind with Combobox
  dv.Sort = "[Display Name] Asc"
  cboEmpName.DataSource = dv
  cboEmpName.DisplayMember = "Display Name"
  cboEmpName.ValueMember = "Display Name"

Current thread must be set to single thread apartment(STA) mode VB.NET

You may encounter this error when you have Autocomplete Combobox and you are trying to do something from BackgroundWorker. It could be possible that you have set Combobox Control’s Autocomplete Source and Autocomplete Mode properties from the form designer view itself. Instead please set these properties from the code. Please see below:


   cboEmpName.AutoCompleteMode = AutoCompleteMode.SuggestAppend
   cboEmpName.AutoCompleteSource = AutoCompleteSource.ListItems

Simply by doing this you may avoid that annoying error! Happy Coding. 🙂

Export datagridview data to Excel – VB.NET

Hello All! You would have seen so many similar posts like this on the web. So whats special about this code. Please see below:

– Save file dialog box to save the file to specific location.
– Autofit all columns from code itself.
– Column header is bold and in different color.
– Convert specific column to datetime column in Excel.
– Checking null values prior to inserting data so your program does not break.
– If any error while putting data in specific cell in Excel, it will give you that cell’s Column and Row number so as to track down data error easily.
– At last release all objects.


Private Sub btnExportEmpSC_Click(sender As System.Object, e As System.EventArgs) Handles btnExportEmpSC.Click
    If grdEmpData.Rows.Count <= 0 Then
        Exit Sub
    End If
    Dim result As MsgBoxResult = MsgBox("Are you sure you want to export current report to Microsoft Excel File?", MsgBoxStyle.OkCancel, "Export to Excel Confirmation")
    If result = MsgBoxResult.Ok Then
        GoExportToExcel()
    Else
        Exit Sub
    End If
End Sub

Private Sub GoExportToExcel(ByVal grdView As DataGridView, ByVal img As PictureBox, ByVal grpBox As GroupBox, ByVal srce As String)
    Try
        Dim FileName As String = Nothing
        Dim sfd As New SaveFileDialog() ' this creates an instance of the SaveFileDialog called "sfd"
        sfd.Filter = "Excel file (*.xlsx)|*.xlsx|All files (*.*)|*.*"
        sfd.Title = "Save SAK Excel File"
        sfd.DefaultExt = ".xlsx"
        sfd.FilterIndex = 1
        sfd.RestoreDirectory = True
        sfd.OverwritePrompt = True
        If sfd.ShowDialog() = DialogResult.OK Then
            If Not sfd.FileName = "" Then
                FileName = sfd.FileName ' retrieve the full path to the file selected by the user and pass it to save excel at end
                If Not chkFile(FileName) Then
                    MsgBox("File you're trying to save is already open. Please close the file and try again.", MsgBoxStyle.Exclamation, "File Open")
                    Exit Sub
                End If
            Else
                Exit Sub
            End If
        End If
        grpBox.BackColor = Color.LightGray
        grpBox.Enabled = False
        img.Visible = True
        img.BringToFront()
        img.Refresh()
        Dim xlApp As excel.Application
        Dim xlWorkBook As excel.Workbook
        Dim xlWorkSheet As excel.Worksheet
        Dim misValue As Object = System.Reflection.Missing.Value
        Dim i As Integer
        Dim j As Integer
        xlApp = New excel.Application
        xlWorkBook = xlApp.Workbooks.Add(misValue)
        xlWorkSheet = xlWorkBook.Sheets("sheet1")
        ' Specify starting index if you are reusing this function
        Dim startIdx As Integer = 0
        For cnt As Integer = startIdx To grdView.ColumnCount - 1
            xlWorkSheet.Cells(1, cnt + 1) = grdView.Columns(cnt).Name.ToString()
        Next
        Try
            For i = 0 To grdView.RowCount - 1
                For j = startIdx To grdView.ColumnCount - 1
                    ' Check for null values
                    If IsDBNull(grdView(j, i).Value) Then
                        xlWorkSheet.Cells(i + 2, j + 1) = ""
                        Exit For
                    End If
                    ' IF DATETIME COLUMN THEN CONVERT STRING TO DATETIME
                    If grdView.Columns(j).Name.Contains("COMPLETION_DATE") Then
                        xlWorkSheet.Cells(i + 2, j + 1) = Convert.ToDateTime(grdView(j, i).Value.ToString())
                    Else
                        xlWorkSheet.Cells(i + 2, j + 1) = grdView(j, i).Value.ToString()
                    End If
                Next
            Next
        Catch ex As Exception
            MsgBox("Error occurred while processing value : " & grdView(j, i).Value & ": Current Position : Row = " & i & " , Column = " & j & Chr(10) & "Please contact your application administrator.", MsgBoxStyle.Exclamation, "Excel Export Error")
        End Try
        ' Autofit Columns
        xlWorkSheet.Range("A1:X1").EntireColumn.AutoFit()
        ' Column Header Bold and Gray Color
        Dim style As excel.Style = xlWorkSheet.Application.ActiveWorkbook.Styles.Add("NewStyle")
        ' Bold Header
        style.Font.Bold = True
        ' Light Gray Column Back Color 
        style.Interior.Color = System.Drawing.ColorTranslator.ToOle(System.Drawing.Color.LightGray)
        xlWorkSheet.Range("A1:K1").Style = "NewStyle"
        ' Save to file
        xlWorkSheet.SaveAs(FileName)
        xlWorkBook.Close()
        xlApp.Quit()
        ' Release objects
        releaseObject(xlApp)
        releaseObject(xlWorkBook)
        releaseObject(xlWorkSheet)
        MsgBox("Successfully saved file at " & FileName, MsgBoxStyle.Information, "Success")
    Catch ex As Exception
        MsgBox("Error occurred while exporting data to Microsoft Excel - " & srce & ". Please contact your application administrator." & Chr(10) & ex.Message, MsgBoxStyle.Exclamation, "Excel Data Export Error")
    Finally
        grpBox.BackColor = Color.White
        img.Visible = False
        img.SendToBack()
        grpBox.Enabled = True
    End Try
End Sub

Private Function chkFile(ByVal selectedFile As String) As Boolean
    Try
        File.Open(selectedFile, FileMode.Open, FileAccess.Read, FileShare.None)
        Return False
    Catch ex As Exception
        Return True
    End Try
End Function

Private Sub releaseObject(ByVal obj As Object)
    Try
        System.Runtime.InteropServices.Marshal.ReleaseComObject(obj)
        obj = Nothing
    Catch ex As Exception
        obj = Nothing
    Finally
        GC.Collect()
    End Try
End Sub


Reset button backcolor to default VB.NET

If your program has requirement where it’s changing the background color of button when certain condition met and reset it to default system color when user clears the form, then please use the code as below:

' Change Color
Private Sub goChangeColor()
        btnSave.BackColor = Color.IndianRed
        btnSave.ForeColor = Color.White
        btnSave.Text = "I'm red"
End Sub

' Reset it back to its default system color
Private Sub goClearData()
        btnSave.BackColor = DefaultBackColor
        btnSave.ForeColor = DefaultForeColor
        btnSave.UseVisualStyleBackColor = True
        btnSave.Text = "I'm default"
End Sub

Now in our code we have used “btnSave.UseVisualStyleBackColor = True”. For some reason, when you programmatically change the backcolor of button, it change this property to “False” so we have to manually change this property back to true to have that Shiny effect (default system color) on our button.

Create dynamic array VB.NET

Dynamic array is useful when you don’t know the size of the array while declaring but will know the size at run time. The beauty of this type of array is you can resize at any time. You declare dynamic array as a normal array only but without specifying the size of the array.

** NOTE : The alternative is to declare an array with the largest possible size (say 100, 200) and then ignore array elements you don’t need. However, this approach, if overused, might cause the operating environment to run low on memory.

For example, I want to create a blank array and while run time I want to specify the size according to my dataset row count. Please see the solution below:

Dim roleId() As String = {0}     
...
...
...
ReDim roleId(myDataSet.Tables("MyData").Rows.Count - 1)

Now each time you use ReDim, all your values stored in array previously will be lost. If you want to preserve the previous values of array without losing it, then you need to use Preserve keyword

ReDim Preserve roleId(myDataSet.Tables("MyData").Rows.Count - 1)

Add data to existing row in datatable OR Edit rows in datatable VB.NET

Think of a scenario where you are populating dataset/datatable directly from database. Now after that, you want to add some customized columns to the existing datatable and populate data in those newly created columns. Please find the solution below:

Dim myDataSet As DataSet = New DataSet

' I assume you already have populated datatable.
myDataSet = _access.GetYourDataFromDataBase() 

' Now Add your customized column
myDataSet.Tables("YourDataTable").Columns.Add("MyColumn", GetType(String))

' You Do Not Know the Index of the Row That You Want To Edit
myDataSet.Tables("YourDataTable").Rows(rawCnt)("MyColumn") = "Parth"

' You Know the Index of the Row That You Want To Edit
myDataSet.Tables("YourDataTable").Rows(0)("MyColumn") = "Parth"

CSS Basics

I have created few important topics to build your CSS base strong.

HTML Branching

Typically, your HTML should look like below:

1. First is your HTML tag.
2. From HTML, two big branches come out that is HEAD and BODY.
3. Inside your HEAD would be Title, Link, Script, Meta, etc…
4. And finally BODY tag will contain all DIV’s (containers) to place rest of the HTML elements.

Html Tree

HTML Tree


HTML – DIV

Short for ‘Division’, div defines a section in your HTML document and allows you to divide your page into containers. You will be able to style different parts of your website (i.e. Header, Menu, Sidebar, Contents, Footer, etc…) by dividing your page using different div’s


HTML – SPAN

While div allows you to divide your webpage into pieces, allows you to control styling for smaller parts of your page, such as text. For example, if you always want the first word of your paragraphs to be red, you can wrap each first word in tags and make them red using CSS!


CSS Box Model

Each HTML element is like a box (DIV, P, h1, etc…) and all these boxes make your webpage. This is known as CSS Box Model. CSS allows you to control these boxes. See below my version of CSS Box Model.


CSS Box Model

CSS Box Model


The Margin is the space around element.
The Border is the edge of the element.
The Padding is the spacing between the content and the border.
The Content is the actual “stuff” in the box.

*** JUST REMEMBER :

M B P C

(Margin, Border, Padding, Content)